Add Payment Initiation to your app
Learn how to use Payment Initiation for account funding in your application
In this guide, we start from scratch and walk through how to set up a Payment Initiation flow for account funding.
Payment Initiation flow overview

payment_initiation link_token by interfacing with Plaid endpoints. It then passes the temporary token to your client app.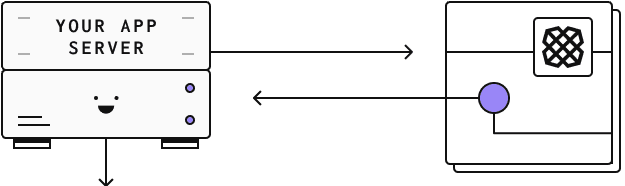
link_token to initiate a Link flow for your user. The onSuccess callback signals that the payment has been initiated.
PAYMENT_STATUS_UPDATE webhooks to keep track of the payment's status.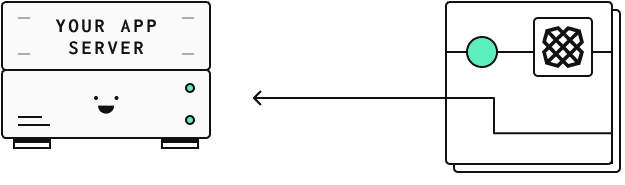
For a high-level overview of all our payment related offerings, see the Introduction to Payment Initiation.
Get Plaid API keys and complete application and company profile
If you don't already have one, you'll need to create a Plaid developer account. After creating your account, you can find your API keys under the Team Settings menu on the Plaid Dashboard.
You will also need to complete your application profile and company profile on the Dashboard. The information in your profile will be shared with users of your application when they manage their connection on the Plaid Portal, and must be completed before connecting to certain institutions.
Access Payment Initiation
Payment Initiation is enabled in Sandbox by default. It uses test data and does not interact with financial institutions. You'll need to request access to Payment Initiation before using it in either Development or Production. To get access to Payment Initiation, submit a product access request Support ticket.
Install and initialize Plaid libraries
You can use our official server-side client libraries to connect to the Plaid API from your application:
Select group for content switcher1// Install via npm2npm install --save plaidAfter you've installed Plaid's client libraries, you can initialize them by passing in your client_id, secret, and the environment you wish to connect to (Sandbox, Development, or Production). This will make sure the client libraries pass along your client_id and secret with each request, and you won't need to include them in any other calls.
1// Using Express2const express = require('express');3const app = express();4app.use(express.json());56const { Configuration, PlaidApi, PlaidEnvironments } = require('plaid');78const configuration = new Configuration({9 basePath: PlaidEnvironments.sandbox,10 baseOptions: {11 headers: {12 'PLAID-CLIENT-ID': process.env.PLAID_CLIENT_ID,13 'PLAID-SECRET': process.env.PLAID_SECRET,14 },15 },16});1718const client = new PlaidApi(configuration);Setting up the payment
Before we jump into the code, let's see an overview of the steps needed to set up your payment with Plaid:

recipient_id. You can reuse this recipient_id for future payments.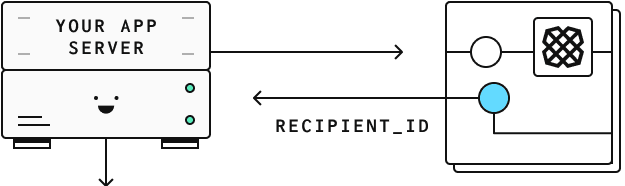
recipient_id to Plaid when you create a payment. Store the resulting payment_id along with your payment metadata.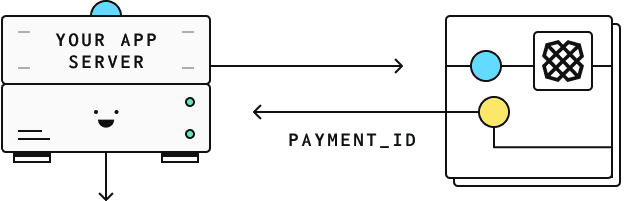
payment_id to create a link_token.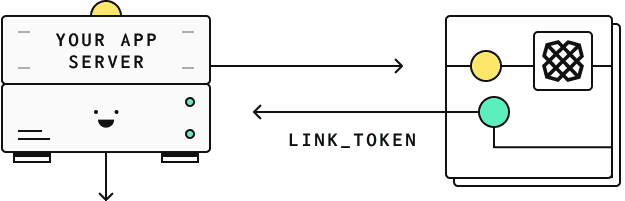
link_token to your client app to initialize Link.
Create a recipient
Before beginning the payment initiation process, you will need to know the name and account information of the recipient. With this information in hand, you can then call /payment_initiation/recipient/create to create a payment recipient and receive a recipient_id. You can later reuse this recipient_id for future payments to the same account.
1const { PaymentInitiationRecipientCreateRequest } = require('plaid');23// Using BACS, without IBAN or address4const request: PaymentInitiationRecipientCreateRequest = {5 name: 'John Doe',6 bacs: {7 account: '26207729',8 sort_code: '560029',9 },10};11try {12 const response = await plaidClient.paymentInitiationRecipientCreate(request);13 const recipientID = response.data.recipient_id;14} catch (error) {15 // handle error16}Create a payment
Now that you have the recipient_id, you can provide it together with the payment amount to /payment_initiation/payment/create, which returns a payment_id.
1const { PaymentInitiationPaymentCreateRequest } = require('plaid');23const request: PaymentInitiationPaymentCreateRequest = {4 recipient_id: recipientID,5 reference: 'TestPayment',6 amount: {7 currency: 'GBP',8 value: 100.0,9 },10};11try {12 const response = await plaidClient.paymentInitiationPaymentCreate(request);13 const paymentID = response.data.payment_id;14 const status = response.data.status;15} catch (error) {16 // handle error17}Make sure to store the payment_id in your backend together with your own metadata (e.g. your internal user_id). You can use this later to process the payment status updates
Create a link_token
Before initializing Link, you need to create a new link_token on the server side of your application.
A link_token is a short-lived, one-time use token that is used to authenticate your app with Link.
You can create one using the /link/token/create endpoint. Then, on the client side of your application, you'll need to initialize Link with the link_token that you created. This will bring up the Payment Initiation flow in Link that allows your end user to confirm the payment.
When calling /link/token/create to create a token for use with Payment Initiation, you provide the payment_id and specify payment_initiation as the product.
While it is possible to initialize Link with many products, payment_initiation cannot be specified along with any other products and must be the only product in Link's product array if it is being used.
In the code samples below, you will need to replace PLAID_CLIENT_ID and PLAID_SECRET with your own keys, which you can get from the Dashboard.
1// Using Express2app.post('/api/create_link_token', async function (request, response) {3 const configs = {4 user: {5 // This should correspond to a unique id for the current user.6 client_user_id: 'user-id',7 },8 client_name: 'Plaid Test App',9 products: [Products.PaymentInitiation],10 language: 'en',11 webhook: 'https://webhook.sample.com',12 country_codes: [CountryCode.Gb],13 payment_initiation: {14 payment_id: paymentID,15 },16 };17 try {18 const createTokenResponse = await client.linkTokenCreate(configs);19 response.json(createTokenResponse.data);20 } catch (error) {21 // handle error22 }23});Once you have exposed an endpoint to create a link_token in your application server, you now need to configure your client application to import and use Link.
Launch the Payment Initiation flow in Link
Plaid Link is a drop-in module that provides a secure, elegant authentication flow for the many financial institutions that Plaid supports. Link makes it secure and easy for users to connect their bank accounts to Plaid. Because Link has access to all the details of the payment at the time of initialization, it will display a screen with the payment details already populated. All your end user has to do is log in to their financial institution through a Link-initiated OAuth flow, select a funding account, and confirm the payment details.

Note that these instructions cover Link on the web. For instructions on using Link within mobile apps, see the Link documentation. If you want to customize Link's look and feel, you can do so from the Dashboard.
Install Link dependency
1<head>2 <title>Link for Payment Initiation</title>3 <script src="https://cdn.plaid.com/link/v2/stable/link-initialize.js"></script>4</head>Configure the client-side Link handler
Plaid communicates to you certain events that relate to how the user is interacting with Link. What you do with each of these event triggers depends on your particular use case, but a basic scaffolding might look like this:
1const linkHandler = Plaid.create({2 // Create a new link_token to initialize Link3 token: (await $.post('/create_link_token')).link_token,4 onSuccess: (public_token, metadata) => {5 // Show a success page to your user confirming that the6 // payment will be processed.7 //8 // The 'metadata' object contains info about the institution9 // the user selected.10 // For example:11 // metadata = {12 // link_session_id: "123-abc",13 // institution: {14 // institution_id: "ins_117243",15 // name:"Monzo"16 // }17 // }18 },19 onExit: (err, metadata) => {20 // The user exited the Link flow.21 if (err != null) {22 // The user encountered a Plaid API error prior to exiting.23 }24 // 'metadata' contains information about the institution25 // that the user selected and the most recent API request IDs.26 // Storing this information can be helpful for support.27 },28 onEvent: (eventName, metadata) => {29 // Optionally capture Link flow events, streamed through30 // this callback as your users connect with Plaid.31 // For example:32 // eventName = "TRANSITION_VIEW",33 // metadata = {34 // link_session_id: "123-abc",35 // mfa_type: "questions",36 // timestamp: "2017-09-14T14:42:19.350Z",37 // view_name: "MFA",38 // }39 },40});4142linkHandler.open();Unlike other products, for payment_initiation it is not necessary to exchange the public_token for an access_token. You only need the payment_id to interact with the payment_initiation endpoints.
Verify payment status
Listening for status update webhooks
Once the payment has been authorised by the end user and the Link flow is completed, the onSuccess callback is invoked, signaling that the payment status is now PAYMENT_STATUS_INITIATED.
From this point on, you can track the payment status using a webhook that is triggered by Plaid when updates occur:
Updates are sent by Plaid to the configured webhook URL to indicate that the status of an initiated payment has changed. All Payment Initiation webhooks have a
webhook_typeofPAYMENT_INITIATION.Once you receive the status update, use the
payment_idfield to retrieve the payment's metadata from your database.From the status update object, use the
new_payment_statusfield to the decide what action needs to be taken for this payment. For example, you may decide to fund the account once the payment status isPAYMENT_STATUS_EXECUTEDor notify the user that their payment got rejected (PAYMENT_STATUS_REJECTED).
For more information on how to implement your webhook listener, see the webhooks documentation.
The EXECUTED status indicates that funds have left the payer’s account, but it doesn’t offer absolute assurance that funds will settle. If you require strong settlement guarantees, Plaid provides Payment Confirmation through the Virtual Accounts product.
Generally, payments settle within seconds with instant payment schemes. However, settlement may take one business day or more when slower payment schemes are selected. The most common payment schemes and their settlement times are:
- Faster Payment System: An instant payment scheme used in the UK. The money is usually available in the receiving customer’s account almost immediately, although it can sometimes take up to two hours.
- SEPA Instant Credit Transfer: A pan-European instant payment scheme. Under the SEPA Instant Credit Transfer rules, funds will made available on the account in less than ten seconds.
- SEPA Credit Transfer: A pan-European payment scheme where payments are processed and settled within one business day.
Polling for status updates
The status of a payment can also be retrieved using the /payment_initiation/payment/get endpoint.
1const { PaymentInitiationPaymentGetRequest } = require('plaid');23const request: PaymentInitiationPaymentGetRequest = {4 payment_id: paymentID,5};6try {7 const response = await plaidClient.paymentInitiationPaymentGet(request);8 const paymentID = response.data.payment_id;9 const paymentToken = response.data.payment_token;10 const reference = response.data.reference;11 const amount = response.data.amount;12 const status = response.data.status;13 const lastStatusUpdate = response.data.last_status_update;14 const paymentTokenExpirationTime =15 response.data.payment_token_expiration_time;16 const recipientID = response.data.recipient_id;17} catch (error) {18 // handle error19}Sample code in Plaid Pattern
For an example implementation of Payment Initiation, see the Payment Initiation Pattern App on GitHub, which uses Payment Initiation in an account funding use case.
Next steps
If you're ready to launch to Production, see the Launch checklist.